Thursday, 25 March 2021

Batch Management complete configuration in MM, PP & SD module

Functional Usage:-

This functionality is activated in SAP based on the business requirement that products produced and procured need to be identified separately for tracking purposes. Food industries, pharmaceuticals, and chemical industries are a good example where Batch Management needs to be maintained. Tracking a material with a unique Batch number involves several functions in SAP:  

  1. Inventory Management (IM) – To search Batch numbers during material movement into the plant
  2. Production/Process Order (PO) – To search  Batch stock for components when creating/releasing PO
  3. Sales and Distribution (SD) – Search for Batch during Sales Order processing.
  4. Warehouse Management (WM) – To search specific Batch for a Warehouse.

Batch Management Level

There are three different levels for Bath Management:

Plant Level

At a plant level, a Batch number is unique for a material inside a plant only. The same Batch number can be generated at another plant under the same Company, though these Batches are not the same. If a plant-to-plant stock transfer scenario is used, plant-level Batch numbering is not suitable.

Client Level

In this case, the Batch number is unique for the entire Client, meaning the same Batch number will not be generated for different Plants under the same Company Code. This method is useful when plant-to-plant stock transfer is used, and the Batch number is supposed to be unique.

Material Level

With this method, the Batch number will be unique at the material level only. Thus, in a given plant, different materials can have the same Batch number.
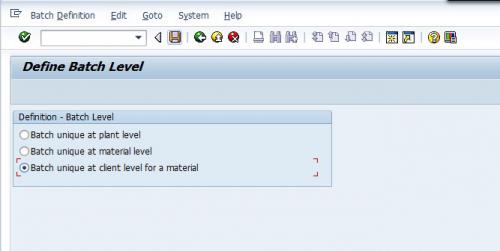
 

SAP Batch Level Configuration

Batch Specifications Master Data Structure

Creation of Characteristics 

Characteristics can have a fixed value, number range, or can pull values from SAP tables directly. For example, the production date of manufacturing of a produced goods can be found from production order table data, and manual intervention is not required.

During characteristics creation (Tcode CT04), we define how characteristics values will be maintained. Also, characteristics values can be blank so that it can be maintained at a material master classification view later on.
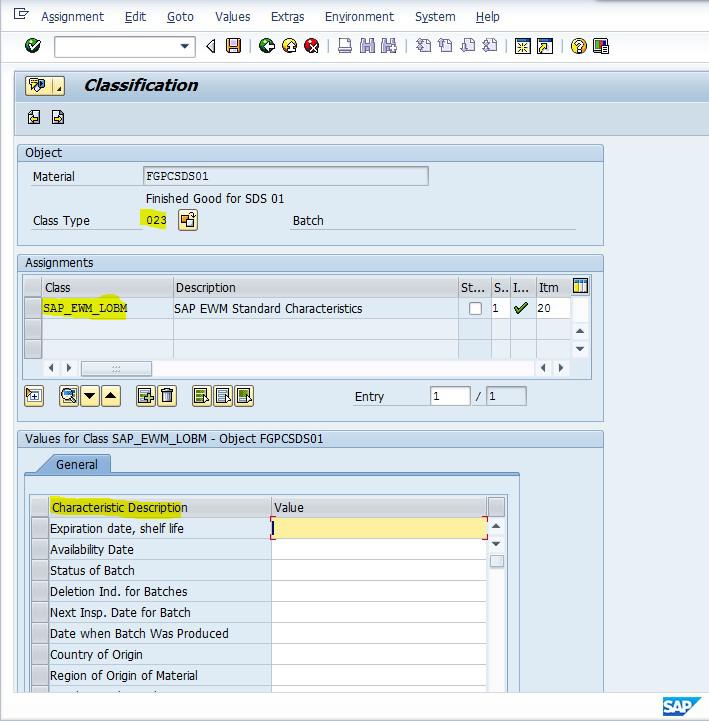
 

Material Classification, Class, Class Type, and Characteristics

Creation of Class

All required characteristics are assigned into a Class (Tcode CL01) with class type 023 (Batch Class). In the figure above, ‘SAP_EWM_LOBM’ is the required class that holds all relevant characteristics.

Material Master Maintenance

Finally, the class with assigned characteristics is maintained in the material master classification view (Tcode MM01/MM02). Also, the Batch Management box is ticked in the material master view.


Define Batch Determination

Automatic Batch Determination is used in Inventory Management, Production, Sales & Distribution, and Warehouse Management. It is used to select batches and allocate them in a manufacturing order, an outbound delivery, or a goods issue/good receipt/goods transfer in Inventory Management.

In Production, Sales & Distribution, Inventory Management, or Warehouse Management, the batch determination is used to search and allocate batches for the components in production/process orders. Alternatively, batch determination is used to search and allocate the delivery batches in a customer-based outbound delivery or to search and allocate batches in goods issues.


Create Batch Determination Condition Technique

Once Batch determination condition tables have been created, they become the key combination fields for searching batches. Eventually, the condition records or search strategies are created as master data based on these key combinations. The Condition Tables are created separately for IM, Production, WM, and Sales.
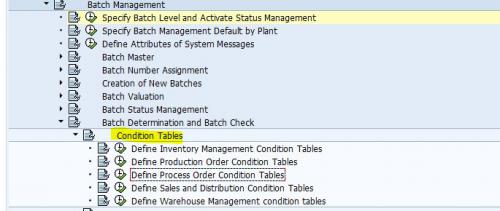
 

Condition Table

 Different Menu Path for IM, PO, SD, and WM Relevant Condition Table 
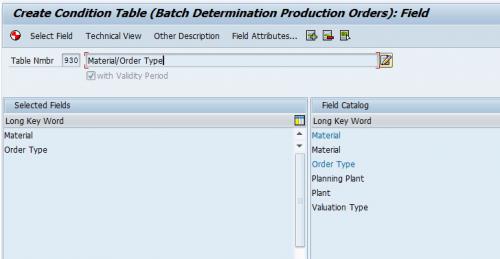
 

Batch Condition Table for Production Order

Fig. 4: Batch Condition Table for Production Order


Create Batch Determination Access Sequence

Batch determination access sequences have multiple condition tables (key combinations) assigned in a sequence of priority. This facility allows you to create data for many key combinations so that even if the batch search fails on the first key combination condition, the rest in the priority will help in the search. The Access Sequences are created separately for IM, Production, WM, and Sales. The below screenshot shows all the screens involved in the access sequence configuration.
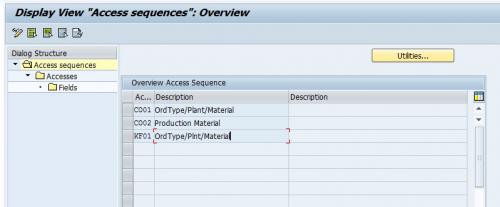
 

Batch Access Sequence

Batch Access Sequence


Create Batch Strategy Types

A Batch Search Strategy contains multiple access sequences, though not assigned in any sequential priority. The assignment of the strategy types is done separately for IM, Production, WM, and Sales. The strategy types or condition types are assigned in priority in the next step called “Batch Search Procedure Definition.”

A Batch search strategy is used to search batches using specific rules because you want to automate the process and do not want it to do it manually for every Batch. Thus, you have to aid the system in putting in a decision such as - search all the batches of a given plant, search all batches of a given set of materials within a plant, or search batches for a given component.
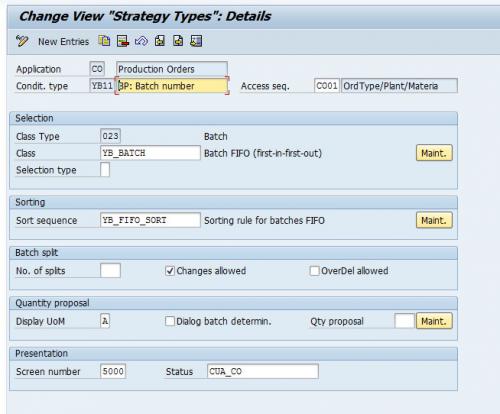
 

Batch Strategy Types

Batch Strategy Types


Create Batch Search Procedure

A Batch Search procedure contains multiple strategy types assigned in sequential priority. The Batch search procedure thus becomes the final configuration, which includes the total search configuration together. As before, the Batch Search Procedures are created separately for IM, Production, WM, and Sales.
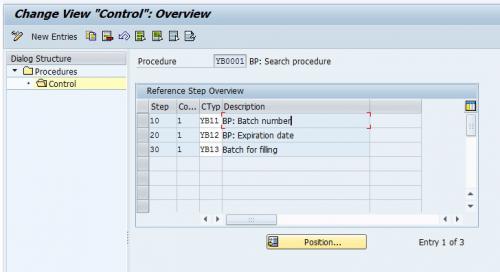
 

Batch Search Procedure

Batch Search Procedure


Batch Search Procedure Allocation and Check Activation

In this step, we allocate the batch search procedure to the respective modules. In the case of Inventory Management, the Batch search procedures are assigned to the Movement types. In the case of Production or process orders, the batch search procedures are attached to the production plants and order types.

For the Sales & Distribution module, the Batch Search Procedures are assigned to the Sales Areas and Sales document type. And finally, for Warehouse Management, the Batch Search procedures are attached to the Warehouse number and can also be assigned to the warehouse number + Movement type combination.
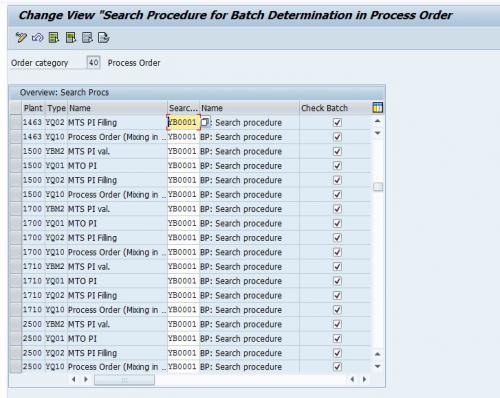
 

Production/Process Order Batch search procedure

Production/Process Order Batch search procedure allocation via plants and order types


After completing the entire configuration, the Batch search condition record can be generated using these SAP transaction codes:

  • For Inventory Management: MBC1 – Create, MBC2 – Change, MBC3 – Display
  • For Production Order/Process Order: COB1 – Create, COB2 – Change, COB3 – Display
  • For Sales & Distribution: VCH1 – Create, VCH2 – Change, VCH3 – Display
  • For Warehouse Management: LS51 – Create, LS52 – Change, LS53 – Display.


New changes in Batch Management in S/4 HANA 1809 ( Interview Q & A )

SAP provides a more flexible solution in batch management. A new feature has been introduced as a new field in material master, batch management required indicator(Plant).

 Business can activate the batch management for materials (batch level = material) but deactivate the batch management at plant level. 

This functionality has outstretched the usage of batch management, with material being managed in batches in 1 plant and simultaneously it can be non batch managed in another plants. 

The ownership of using batch management now can be controlled from plants. Prior to S/4 HANA 1809, if a product is batch managed and level of activation is at material level, then all the plants were affected with this. 

 Sometimes business requires to keep batch managed product in Production plant but during Cross plant STOs to distribution plant, Batch should be switched off or should be switched on Selected plants. This feature gives a leverage to work with batch management in One plant and non batch management in another plant, so this switch is controlling at Plant level which earlier was unable prior to S/4 HANA 1809. In below example, A product which is batch managed in Production plant 1000.

 The inventory will be at Plant+Sloc+Batch. The 2 distribution plant operates with non batch managed enabled inventory( Inventory should be (Plant+Sloc only), so Stock transferred from production plant 1000, the distribution 1001 and 1003 plant should be able to keep stock without batch. However, You can keep stock at batch level for other distribution plant(1002), if they need to store it. SAP has given a new field in material master to activate the batch management for the required plant only.

SAP has given a new field in material master to activate the batch management for the required plant only.

New configuration is provided to enable or disable this settings in OCHA. Batch level will activated at material level for the required plant, however if it required to deactivate the settings, selected plant can be deactivated so that inventory will not be at batch level.


Take a test.

Transfer a batch stock from MPRL plant (Batch Managed) to PL01( Non natch managed). However, Material is activated as batch managed.


Conduct Stock transfer between 2 plants either by STO or by 2 step stock transfer(303, 305).

Stock is transferred from MRPL to PL01 without batch.


This functionality will definitely enhance the business requirement to keep batch stock in one plant and without batch in another if multiple plants operate in stock transfer scenarios like production plant and distribution plants

Wednesday, 24 March 2021

Business Partner Complete Configuration in S/4 HANA 1709


Creation of a Business Partner:-

         1.1 Define BP Roles


Path


SPRO → IMG → Cross-Application Components→ SAP Business Partner→ Business Partner → Basic Settings → Number Ranges and Groupings→ Define Number Ranges.

T- Code

NA


BP Roles

Title

Description

FLCU00

FI Customer

Business Partner FI Customer

FLCU01

Customer Sales

Business Partner Customer Sales

FLVN00

FI Vendor

Business Partner Vendor FI

FLVN01

Vendor Purchase

Business Partner Vendor Purchase


Process:- 

·         Standard BP Roles will be used

·         Rename the Role

·         Save it.

         1.2 Define Number Ranges


Path


SPRO → IMG → Cross-Application Components→ SAP Business Partner→ Business Partner → Basic Settings → Number Ranges and Groupings→ Define Number Ranges.

T- Code


No.

From No.

To No.

External Assignment


K1

2xxxxxx

2xxxxxx


K2

2xxxxxx

2xxxxxx


K3

2xxxxxx

2xxxxxx


K4

2xxxxxx

2xxxxxx


K5

2xxxxxx

2xxxxxx


K6

2xxxxxx

2xxxxxx


K7

2xxxxxx

2xxxxxx


K8

2xxxxxx

2xxxxxx


K9

2xxxxxx

2xxxxxx

Tick

D1

1xxxxxx

1xxxxxx


D2

1xxxxxx

1xxxxxx


D3

1xxxxxx

1xxxxxx


D4

1xxxxxx

1xxxxxx


D5

1xxxxxx

1xxxxxx


D7

1xxxxxx

1xxxxxx


D9

1xxxxxx

1xxxxxx

Tick


Process:- 

·         Click on Intervals

·         Maintain the Number Ranges for BP, Customer and Vendors

·         Save it.

         1.3 Define Groupings and Assign Number Ranges


Path


SPRO → IMG → Cross-Application Components→ SAP Business Partner→ Business Partner → Basic Settings → Number Ranges and Groupings→ Define Groupings and Assign Number Ranges.

T- Code

NA


Grouping

Short Name

Description

Number Range


AK10

Domestic Vendors

Domestic Vendors

K1

AK20

Transport Vendors

Transport Vendors

K2

AK30

Service Vendors

Service Vendors

K3

AK40

Import Vendors

Import Vendors

K4

AK50

FI Vendor

FI Vendor

K5

AK60

Sub Contract Vendor

Sub Contract Vendor

K6

AK70

One Time Vendor

One Time Vendor

K7

AK80

AsianLak Employees

AsianLak Employees

K8

AK90

STO Plant as Vendor

STO Plant as Vendor

K9

AD10

CUST – Distributor

CUST – Distributor

D1

AD20

CUST - Modern Trade

CUST - Modern Trade

D2

AD30

CUST – Retail

CUST – Retail

D3

AD40

CUST – Export

CUST – Export

D4

AD70

One Time Customer

One Time Customer

D7

AD90

STO Plant as Customer

STO Plant as Customer

D9


Process:- 

·         Click on New Entries

·         Maintain the BP Groupings , Short Name, Description and Number Range

·         Save it.


         1.4 PPO Activation


Path


SPRO → IMG → Cross-Application Components→ Master Data Synchronization → Synchronization Control → Synchronization Control →Activate PPO Requests for Platform Objects in the Dialog.

T- Code

NA


Process:- 

·         Put Tick on PPO Active against Syn. Object

·         Save it.

         1.5 Activate Synchronizations Options


Path


SPRO → IMG → Cross-Application Components→ Master Data Synchronization → Synchronization Control → Synchronization Control → Activate Synchronizations Objects.

T- Code

NA


Source Object

Target Object

Act. Ind.

BP

CUSTOMER

Put Tick On

BP

VENDOR

Put Tick On

CUSTOMER

BP

Put Tick On

VENDOR

BP

Put Tick On


Process:- 

·         Click on New Entries

·         Select the Source Object and Target Object and Activate the Indicator by putting Tick on

·         Save it.

         1.6 Set BP Role Category for Customer Integration


Path


SPRO → IMG → Cross-Application Components→ Master Data Synchronization → Customer / Vendor Integration → Business Partner Settings → Set BP Role Category for Direction BP to Customer.

T- Code

NA


Role Category

Description

FLCU00

Business Partner FI Customer (FS: BP)

FLCU01

Business Partner Customer (FS: BP)


Process:- 

·         Standard Roles

         1.7 Define BP Role for Direct Customer to BP


Path


SPRO → IMG → Cross-Application Components→ Master Data Synchronization → Customer / Vendor Integration → Business Partner Settings → Define BP Role for Direction Customer to BP.

T- Code

NA


Group

BP Role

ZD10

FLCU01

ZD20

FLCU01

ZD30

FLCU01

ZD40

FLCU01

ZD70

FLCU01

ZD90

FLCU01

Process:- 

·         Click on New Entries

·         Select Group and Maintain BP Role

·         Save It.

1.8 Define Number Assignment for Direction BP to Customer


Path


SPRO → IMG → Cross-Application Components→ Master Data Synchronization → Customer / Vendor Integration → Business Partner Settings → Settings for Customer Integration → Field Assignment for Customer Integration → Assign Keys → Define Number Assignment for Direction BP to Customer.

T- Code


Grouping

Short Name

Account Group

Name

Same Numbers

AD10

CUST – Distributor

ZD10

CUST – Distributor

Put Tick

AD20

CUST - Modern Trade

ZD20

CUST - Modern Trade

Put Tick

AD30

CUST – Retail

ZD30

CUST – Retail

Put Tick

AD40

CUST – Export

ZD40

CUST – Export

Put Tick

AD70

One Time Customer

ZD70

One Time Customer

Put Tick

AD90

STO Plant as Customer

ZD90

STO Plant as Customer

Put Tick


Process:- 

·         Click on New Entries

·         Select Grouping and Account Group

·         Put Tick on Same number

·         Save It

         1.9 Set BP Role Category for Vendor Integration


Path


SPRO → IMG → Cross-Application Components→ Master Data Synchronization → Customer / Vendor Integration → Business Partner Settings → Set BP Role Category for Direction BP to Vendor.

T- Code


Role Category

Description

FLVN00

Business Partner FI Vendor (FS: BP)

FLVN01

Business Partner Vendor (FS: BP)


Process:- 

·         Standard Roles

         1.10 Define BP Role for Direct Vendor to BP


Path


SPRO → IMG → Cross-Application Components→ Master Data Synchronization → Customer / Vendor Integration → Business Partner Settings → Define BP Role for Direction Vendor to BP.

T- Code

NA


Group

BP Role

YK10

FLVN01

YK20

FLVN01

YK30

FLVN01

YK40

FLVN01

YK50

FLVN00

YK60

FLVN01

YK70

FLVN01

YK80

FLVN00

YK90

FLVN01

Process:- 

·         Click on New Entries

·         Select Group and Maintain BP Role

·         Save It

         1.11 Define Number Assignment for Direction BP to Vendor         


Path


SPRO → IMG → Cross-Application Components→ Master Data Synchronization → Customer / Vendor Integration → Business Partner Settings → Settings for Vendor Integration → Field Assignment for Vendor Integration → Assign Keys → Define Number Assignment for Direction BP to Vendor.

T- Code


Grouping

Short Name

Account Group

Name

Same Numbers

YK10

Domestic Vendors

ZK10

Domestic Vendors

Put Tick

YK20

Transport Vendors

ZK20

Transport Vendors

Put Tick

YK30

Service Vendors

ZK30

Service Vendors

Put Tick

YK40

Import Vendors

ZK40

Import Vendors

Put Tick

YK50

FI Vendor

ZK50

FI Vendor

Put Tick

YK60

Sub Contract Vendor

ZK60

Sub Contract Vendor

Put Tick

YK70

One Time Vendor

ZK70

One Time Vendor

Put Tick

YK80

AsianLak Employees

ZK80

AsianLak Employees

Put Tick

YK90

STO Plant as Vendor

ZK90

STO Plant as Vendor

Put Tick


Process:- 

·         Click on New Entries

·         Select Grouping and Account Group

·         Put Tick on Same number

·         Save It.


Best Q & A for Interview

Closed MM period reopened in SAP MM

Sometimes, the Client requirement comes to reopen the MM closed period which is not possible directly through the MMPV t-code but We have on...

100% Success Factor